|
|
All the editing tools in the Edit -toolbar have one thing in common - that they work on or with the selected objects. So whatever you are doing with these tools you first have to select something.
|
|
Shapes are selected with the Select Command similarly to most applications. To activate the Select Command, click on the arrow shaped Select button on the Edit -toolbar.
Just point and click with the mouse.
If something is selected when you click an object the previous selection disappers, unless you hold the SHIFT -key in which case the new shape is either added to or removed from the selection.
If you click (on nothing) and drag a box then everything wholly within the box will be selected, or, if the SHIFT -key is used, added/removed to/from the selection.
If you click on a shape (as opposed to nothing) and drag the box the move command is activated. See next chapter. Regardless of what your are doing quickly double-hitting the ESC key toggles between the Select Command and your current drawing command. (A single ESC resets the current drawing command for example ending a polyline and starting a new).
When the Select command is active the selected shapes are hilited and display their handles, as illustrated in figure 9.2.
|
|
Clicking (dragging) a handle activates stretching, which changes the position of the handle and thus the ’shape of the shape’, but usually not the location of the selected shape. If multiple shapes are selected, stretching takes place as if the same handle on each shape was dragged individually. At times this is very powerful, but it can cause surprises when ’the same handle’ on each shape selected is not what you expect. Exactly what stretching does depends on the type of the shape and which handle is stretched. The behaviour is mostly intuitive and it is best to experiment.
If the CTRL is held down while clicking or dragging a handle the move (as opposed to the stretch) command is activated. This allows precise moves by taking advantage of the fact that all handles are snap locations and thus it is easy to align (move) shapes using the handles. If you click on a shape (as opposed to nothing) and drag, the move command is activated. The mouse location becomes the reference for the mouse, but no snap is applied. This makes the move inaccurate so this is not a good way to position shapes, but is handy when you are just moving things around.
If the ALT -key is held down when you initiate a drag then a copy of the selected objects is created and moved around. As in dragging above, this does not allow for precise positioning but it is nevertheless a very handy way to create copies of shapes that can then be precisely positioned. And copying is what computers are all about, see below on Copy / Paste.
When you are dragging, if you move your cursor outside the window you are drawing in, the operation becomes a drag and drop. This means that when you release the mouse button the shapes you were dragging around will be dropped on that mouse location. If that location happens to be another drawing they are either moved or copied there, depending on whether the ALT -key was held down (for copy) or not (move). Drag and Drop combined with Grouped shapes makes it possible to turn drawings into poormans parts libraries from which ready made parts can be dragged to your drawings.
You’ll want to be careful not to accidentally Drop things and lose them, though.
Copying, in other words not repeating work, is what computers are all about. You should never ever recreate something if copying is an option. Well, almost never. You should consider copying even single shapes like lines, because every line you have drawn is a carefully crafted precision piece.
That is why there are so many ways to copy things in jDraft.
We have already mentioned the classic ’Edit/Copy-Paste’ commands and the ALT-Dragging, which, while handy and familiar from typical desktop applications, are not really suitable for precision work.
Because jDraft is all about precision it provides more precise alternatives to these. The Copy / Paste buttons in the Edit -toolbar are almost equal to the menu bar Copy/Paste commands, but differ in that you specify a reference point for precise aligment.
To Copy shapes precisely you first use the Select command to select the objects, then click the Copy button and finally enter the reference point with the mouse using a snap, or numerically if you prefer. This copies the selected object to the clipboard.
This also automatically activates the Paste button.
When the Paste command is active, an outline of the shapes in the clipboard is attached to the cursor to indicate that you can point and snap with the mouse to place a copy of the clipboard contents into your drawing.
When copy-pasting like this, the reference position you specified when copying gets aligned with the point you pick when pasting. Precision work.
The paste command actually comes in four variations, see figure 9.3.
|
|
In addition to the above mentioned ’Paste One’ there are three more commands for pasting multiple copies at once in linear, circular and array formations. These commands takes a number of parameters that you can set in the Paste Settings -dialogue, figure 9.4, which you can bring up by double-clicking the Paste button.
In this dialogue, you can set the number of copies to be pasted and whether or not you want each copy to be rotated to match the orientation. A pre-paste rotation can be also specified.
|
|
The rotation concept seems to cause a lot of grief to people. In fact, it’s rather simple.
When pasting, if rotation is enabled, each copy is rotated before pasting, first by the pre-rotation specified and then by the amount that the first and second paste location differ from horizontal. Rotation is always around the origin, which, in effect, means the reference location used when copying the shapes to the clipboard. When doing circular pastes it is best to visualize how much you need to rotate the shape you are copying to position it so that it lies on its side with the center of rotation to the left of it. This is your pre-rotation.
With this command you enter two points. The first point specifies the location of the first copy. The second point specifies the position of the second copy (incremental mode) or last copy (distributed mode). The copies will be spaced at equal distances from each other.
This is basically similar to Paste Linear except that the copies are pasted on a circular path.
|
|
Figure 9.5 shows how circular paste is used to draw a decorative half circle pattern. First, on the left, a single ’spoke’ is drawn in upright position, hence (in below) the pre-rotate is -90 (clockwise) to align it correctly. Then this is Cut-copied using the tip of the spoke as the reference. Lastly, the semi-circular pattern is created by setting the Paste Paremeters as follows in figure 9.6:
|
|
entering the center and first copy positions by pointing and clicking with the mouse and entering the total angle numerically, figure 9.7.
|
|
But here again the best practice is to take it for a spin, the interactive ’Example’ in the Paste Parameter dialogue is you best your best friend.
This pastes an array of copies on a grid that you specify by entring three points. The first point specifies the location of the first copy. The second point spefifies the position of the second copy on the first row (incremental mode) or last copy on the first raw (distributed mode). The third point specifies either the position of the second copy (incremental mode) on the first column or the last copy on the first column (distributed mode). Looks confusing on paper but is actually quite simple, go ahead and experiment.
Selected shapes can be deleted with the DEL -key or BACKSPACE -key or by using the Edit/Delete -menu command. There is also a Delete button on the Edit panel. Clicking the delete button deletes any selected objects and activates the delete Command, which allows you to point and delete objects by clicking on them.
Moving is pretty straightforward, first you select with the Select Command the shapes you want to move, then click on the Move button and either click two points to indicate a distance and direction for the move or enter Horizontal and Vertical movement numerically.
In practice you’ll most often move things by specifying a point in the selection and a new position for it. Intuitive. Pressing the ’M’ -key gets you to Move Command at any time.
Rotation works along the same lines as the Move command, except that you specify the center of rotation, and either the rotation angle numerically or two points as the ends of an imaginary arc for the rotation angle.
You can group or ungroup shapes with the buttons in the Edit tool bar or with the commands in the right click menu, figure 5.5.
jDraft maintains a log of editing sessions for each document. The log is stored within the document and contains the starting and ending times and the username of each session during which the document was changed. You can view the log by bringing up the dialogue with the Tools/Statistics... -menu command. A summary of total hours put into that drawing is also shown.
If you do not want to have this information recorded you can clear it on a document by document basis or disable it altogether from the Prefererences -dialogue.
|
|
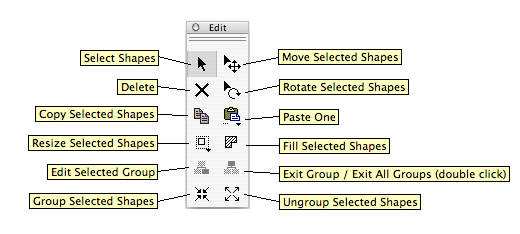 Figure 9.1: Edit Tools -toolbar
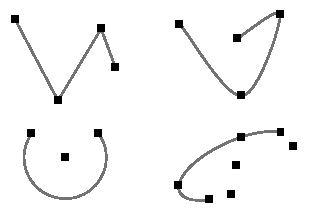 Figure 9.2: Selected Shapes with Handles Visible
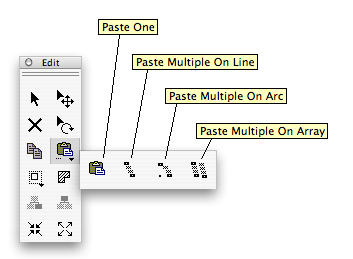 Figure 9.3: Paste -palette
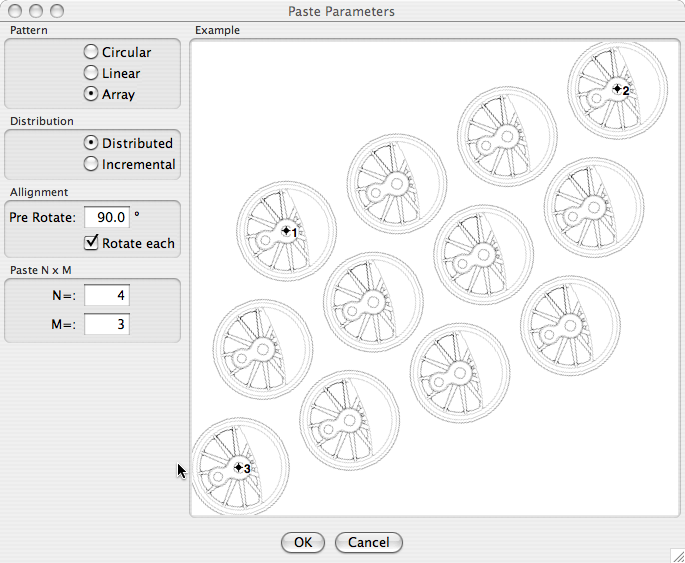 Figure 9.4: Paste Parameters -dialog
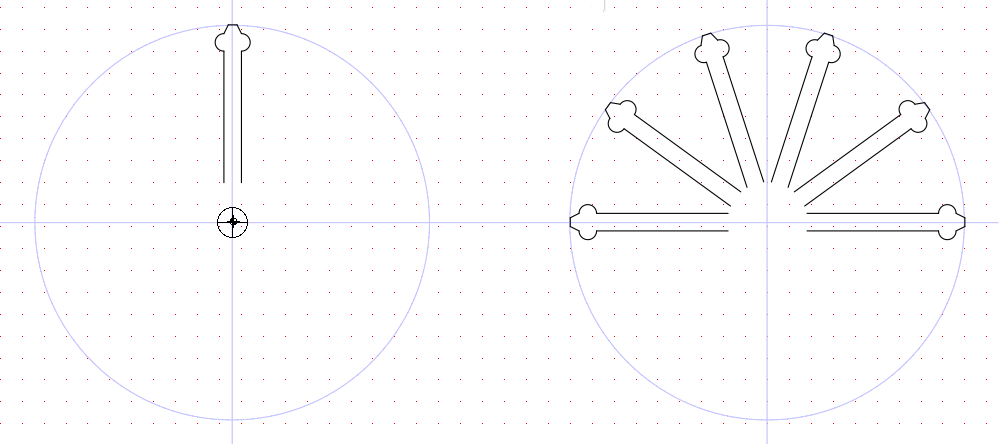 Figure 9.5: Circular Paste Example
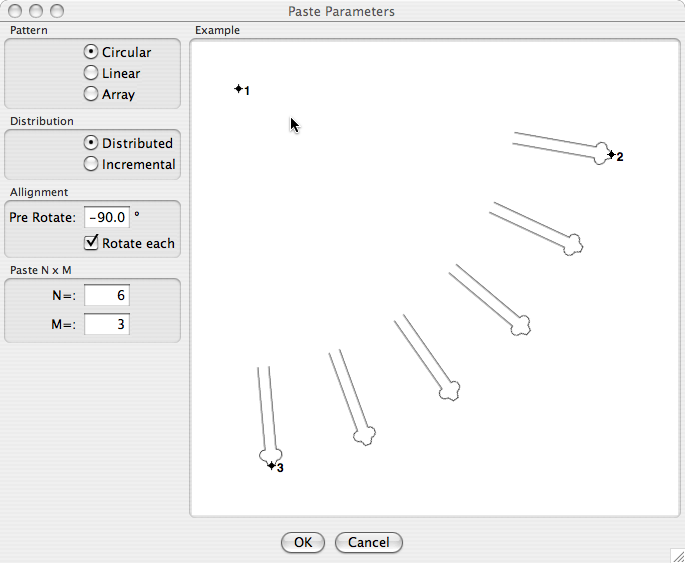 Figure 9.6: Circular Paste Parameters Example
 Figure 9.7: Numeric Entry of Angle
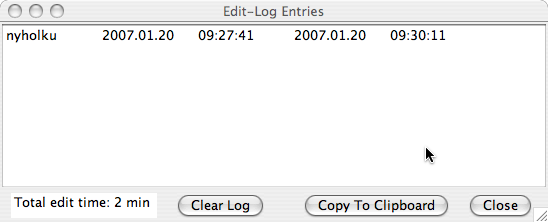 Figure 9.8: Edit Logs -dialog