|
|
Considering that printing should be nothing but committing on paper what has been electronically drafted, it requires quite many options. You set most of these in the File/Print Setup -dialogue, see figure 13.1. Most of the options stem from the special needs of engineering, notably the from the way colors are used and the required large size of drawings.
|
|
Most offices do not have color printers and if they do they are A3 in size at most, typically only A4. In engineering drawing, colors are usually used to aid the design/drafting process. The desired output from engineering is in any drawing essentially colorless as there is the additional requirement of being able to copy the drawings, a process which typically still is monochromatic in large sizes, although we have moved away from blueprints. Although most modern printers can print color images producing gray scale output, this is not satisfactory. That is why jDraft has the option to force the output to black/white, forcing everthing that is not white to black.
In an ideal world, the physical medium a.k.a. paper matches the size of the electronic drawing and the ideal printer can print all up to the edges of paper. In reality this is rarely the case and some adjustements are necessary. jDraft offers three basic options:
The Fit Page option simply scales the drawing to fit the printable area (see below for the more on printable area). With this option the Scale setting is obviously ignored.
The Crop option prints as much as fits on a single page in the requested Scale. Print All prints everything inside the printable area of the drawing (this is not the printable area of the printer) at the requested scale.
There are two printable areas: the printable area of the printer and the printable area of the document.
The printable area of the printer is a physical (or driver) limitation of the printer and means the area which is the physical paper size minus the margins. Note that these margins come from, and are set in, the ’File/Print...’ -dialog in the Page Set -tab.
(Most printers seem to set these at 1 = 25.4 mm by default, which is usually unnecessarily conservative. Most printers can print close to within 0.25 = 6 mm from the paper egde. The only way to find out is to experiment. Note that this is also a driver issue and, depending on the driver, it may not be possible squeeze out everything from the printer hardware.)
The printable area of the document is the drawing size as set in the Settings/Document Size... -dialogue minus the Non Printable Margins set in the File/Print Setup... -dialogue.
Except when using Fit Page option, the question of how the drawing and the physical paper are aligned arises. The alignment determines what gets cropped or where the page breaks are placed.
Selecting left/top aligns the left/top edges of the physical paper and the drawing and the cropping and page breaks are worked starting from that.
Scaling can be used to scale the drawing if the Fit Page option is not selected.
The easiest way is to take advantage of the Preview option, figure 13.2 and experiment with different options.
|
|
However here are some guidelines.
If you print with Fit Page, your only worry is that the scale is not right. If you are lucky, the printable area of your printer is larger than the printable area of your drawing and everything gets printed and printed in the right scale. You only need to care about the aligment, that is, if you care about it.
For a document size that (closely) matches the printer’s physical size, cropping is often an easy option, just try to minimize the paper margins. There will be some cropping on the edges but often this is of no importance. Your only worry is the alignment.
The most complex case is when you have to make-do with the printer that is way too small for your drawings and you need to print in correct scale. Figure 13.3 illustrates what happens then.
This is where the Print All and Non Printable Margins come into picture. Say your drawing is A2 (landscape) but you only have A4 printer. In principle A2 is four times A4 size. So you would like to print your drawing as four pages.
|
|
A4 is 297 mm x 210 mm (width x height, landscape) in size. Say you have found out (by experimenting) that you can print up to within 5 mm from the edges. So the printable area of your printer is 287 mm x 200 mm . The size of A2 is 594 mm x 420 mm. So you need to set the non printable margins as 594 - 2 * 287 = 20 mm, so you set the Non Printable Margins on left and right at 10 mm. On the vertical direction the math is 420 - 2 x 200 = 20 mm as well, so you set the top and bottom at 10mm . This, of course, leaves everything in the 10 mm wide border area of the drawing unprinted. If that is not acceptable, you need to set smaller Non Printable Margins and accept that over 9 pages are outout for this sample case, or get a bigger printer.
jDraft supports printing only the selected shapes, which can used for example to print out selected features of parts for design verification or workshop usage.
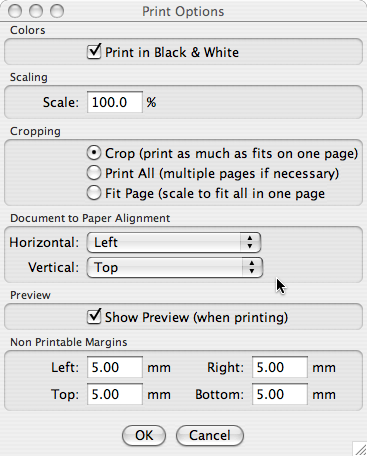 Figure 13.1: Orthogonal Dimensioning -palette
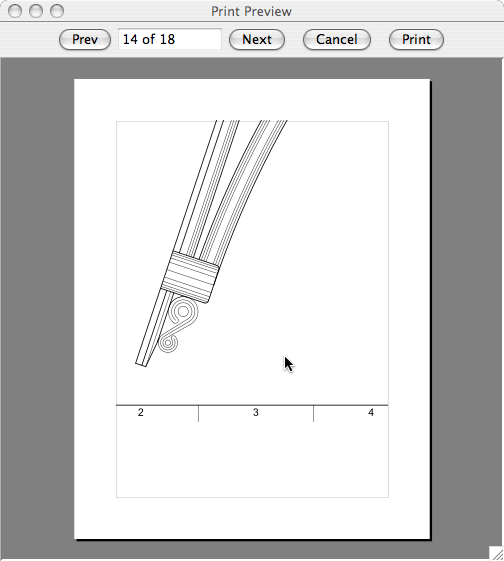 Figure 13.2: Priview -dialog
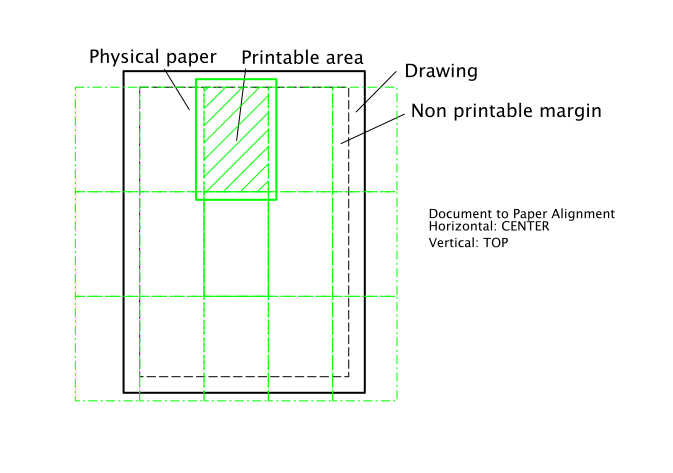 Figure 13.3: Print All On Multiple Papers