For this reason, I've made a few quick drawings that show different types of camera mechanisms, actually called "movements".
In all these drawings, I've left out the film and the "pressure plate" which ensures that the film lies flat against the "gate", i.e. the plate that has the opening that exposes the film frame - this is the rectangular hole shown in the drawings. The pressure plate would be on top of the gate, with a spring loading that presses it against the gate.
All these movements are drawn in a position the camera would have on an animation stand, with the lens below the gate, pointing towards the tabletop. The arrows show the action of the moving parts. The tips of the claws and pins that come in contact with the film are drawn in black.
 |
OSCILLATING CLAW This is the simplest of all movements, used in millions of 8mm and simple 16mm cameras. The claw moves back and forth, is spring loaded to press against the film, and formed in such a way that it engages a perforation when it moves right, and slips over it when moving back to the left, as the shutter opens to expose the frame. This claw only moves the film into position, but does not hold it in place. The pressure plate (not shown) above the film keeps it immobile during the exposure.
|
 |
BOLEX DOUBLE CLAW This is very similar to the mechanism above. However, with two claws, the film can be rewound in the camera - when the camera is cranked backwards, the other claw engages the film and pushes it backward. The claws are not spring loaded to press against the film, but have a pivot with a certain amount of friction, which ensures that the claw will always stay in contact with the film. The pressure plate is again rather heavily spring loaded to keep the film steady.
|
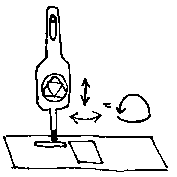 |
ARRIFLEX II The 35 mm Arris have a claw mechanism that is moved in two paths by cams. One cam moves the claw up and down, into and out of the perforation, and the other cam rocks the claw back and forth. These two actions combine into a "D"-formed path. Thus the claw is withdrawn from the perforation and moves back without touching the film during exposure.
|
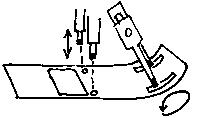 |
MITCHELL MOVEMENT This is a very precise mechanism, thanks to the two "registration" or "pilot" pins that engage the perforations during exposure to keep the film exactly in place. There is a pair of claws that perform the familiar "D"-motion to transport the film. The film path is often curved where the claws engage the film, which reduces stress on the perforations. This movement is precise enough to be used in professional special effects and animation cameras. Click HERE to see a small gif movie (70 K) of an operating Mitchell movement, kindly provided by Ted Kinsman.
|
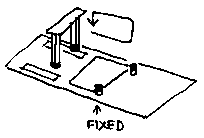 |
BELL & HOWELL MOVEMENT The most precise of them all: because the registration pins are immobile, fixed to the gate, there is no possibility of any play in positioning. However, the mechanism is more complex than the others, because the film has to be lifted off the registration pins in order to be moved by the claws. This necessitates a movable "film channel" (not shown) instead of the standard pressure plate. With this type of movement, it is possible to position the film with extreme accuracy, and that's why this mechanism is favored in optical printers.
|
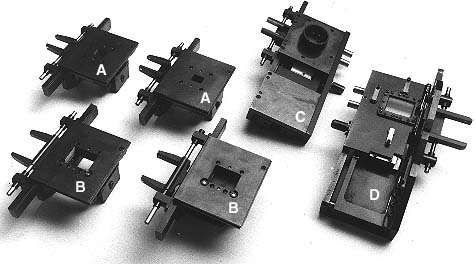
These are all optical printer B&H type movements, A are 16mm, B are 35mm, C is a 16mm "wet-gate" movement, and D a 35mm wet-gate. Wet-gates remove surface scratches from films being printed, since the film frame in the movement is immersed in a liquid that fills any scratches, thus reducing them substantially. The motion of the fluid also cleans any loose dust off the film while it is in the gate, so the result is a cleaner print.
The specifications of 16mm and 35mm film and perforations (by the SMPTE) state a tolerance of 0.01 (one hundredth) mm, or 0.0004 (less than half a thousandth) inch, and a film movement should have the same, or preferably even better, positioning accurracy. That's why a single Mitchell or Bell&Howell movement can cost US$ 10.000 ...
For a picture of the movement in my 35mm animation camera, please go to the "Equipment"-page.

This is a "2-headed" optical printer, using these gates above. Starting from the left, you can see light shining from the lamp house, then at A is the first projector's film gate, at B a lens that projects the film in A onto the second projector's gate C (here a wet-gate - you can see the tubing that carries the fluid to pumps and filters behind the printer). At D is the lens of the camera, the camera's finder is at E and the adjustable shutter control at F. In the heavy base G all the electronics needed for controlling the printer are located.
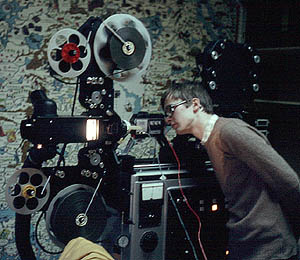
Years ago, I used this printer to make some Super-8 reduction prints from 35mm by adapting a Minolta X-400 camera to the projector, with a switch connected to the projector's motor axle so that the camera exposed a frame every time the projector advanced. I had a separate power supply for the camera (see cables), batteries would have drained in no time. With this setup, I copied a lot of animation on about 200 cassettes of Super-8 - about 10 hours alltogether! Expensive, but great for studying - however, nowadays you can purchase the world's best animation on videotape, for just a fraction of the cost...