How to make a single-frame motor for a Bolex Camera
Page 1 of 3
 Copyright © ANI-MATO, J-E Nystrom, 1996. This information may not be published, transferred or distributed in any way without permission. However, you may publish the author's internet address: http://www.sci.fi/~animato
NOTE: All dimensions are in millimeters.
An inchworm is 25.4 mm long (when asleep)...
The dimensions are not critical, except where noted.
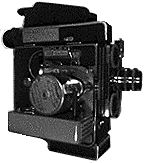
 This motor is easily attached to the side of a Bolex H16 Reflex camera. It requires no modification to the camera, and is attached with only 3 screws, in existing threaded holes in the camera body.
| Note: This design uses a low-voltage AC "synchronous" motor (described below) that ensures an exact rotation speed. An ordinary DC motor (as used in model radio controlled models, for instance) will fluctuate in speed depending on load and voltage, and is thus not suitable.
If you are experienced in electronics, you can substitute the synchronous motor with a "stepper" motor, familiar to those who design computer-controlled motor systems.
However, for simplicity, this description will only cover the design of a synchronous motor drive. |
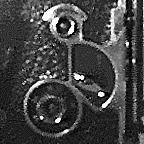
 First you must check the Bolex model you have. If the camera's side looks like in this picture,then it lacks the "1:1" axle, and you cannot use this motor. Sorry about that...
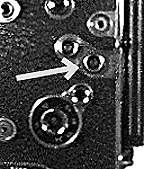
 But, if your camera looks like this, you're in luck: It has the required "1:1" axle, which rotates one turn per frame. (See arrow!)
For an interesting history of the Bolex cameras, different models and features etc., you can check the "small movies" site:
http://www.city-net.com/~fodder/bolex/history.
The Home page of "small movies" contains a lot of interesting info:
http://www.city-net.com/~fodder/toc.html.
What you need:
| IMPORTANT SAFETY NOTICE: These instructions are only for a 24 volt motor, and do not include the extra insulation reqired for mains powered equipment! I will NOT give instructions on how to build a motor powered directly from the mains, and assume no responsibility if you do so. Mains voltages are LETHAL, 110 or 220 volts, depending on your location, so I really recommend that you use a 24 V motor with a safe AC/AC adapter, approved for use in your area. |
A "Bidirectional Synchronous Motor", for 24 volts AC, with a gear box that reduces the speed to 60 RPM, i.e. 1 turn per second. Such motors are used in many appliances, e.g. as timers in washing machines. They are made by many companies, inculding Philips, Crouzet, Saia/Burgess among others. You may be able to find them in an electronics store, if not, you may have to contact the manufacturer's agent for information where to buy one. You could also check your local yellow pages for companies selling small industrial electric motors. These motors are not easy to find, but it should not prove impossible. The motor should be powerful enough to run the camera. Such a motor usually draws 4 to 6 watts of 24 Volt AC power. The one I have is 55 mm in diameter, the gearbox somewhat larger. The important thing is that the motor is small enough to fit on the side of the Bolex, with room to spare for the connection box. The gearbox should also have suitable holes for attachment.
A capacitor for the motor. (Please note: This capacitor MUST be for AC, so an ordinary electrolytic won't do! This type of capacitor is called bipolar, and is often used in loudspeaker filters.) The value (in microfarads) depends on motor type, so follow the motor manufacturer's recommendation. You should get this information together with the motor, usually as a "spec sheet", or you may have to ask the supplier to give you a copy of the specs from a catalog. Usually there's also a sample schematic on how to connect the motor, but I provide a typical one further down...
An AC adapter that drops the mains voltage to a safe 24 Volt AC level. Note: The output should indeed be AC, not DC, which is more common. The adapter should provide enough current (Amperes) for the motor. A 6 watt 24 V motor needs 0.25 Amps. Check the motor specifications!
Hint: I found a perfect adapter (output 24 Volts AC, 0.8 Amps)
included with a cheap ($ 10) set of Christmas tree lights! |
A pushbutton switch for single frame shooting.
A changeover switch for the motor direction. NOTE: The Bolex cannot SHOOT backwards, but if you close the shutter or cover the lens, you can rewind the film for multiple exposures. You MUST rewind a few frames more than you need, and then wind forward again to the exact frame. Not until then can you open the shutter or uncover the lens! This ensures the film will be positioned correctly in the gate.
A small microswitch with a roller lever (se illustration on a following page) to stop the motor with the shutter closed.
Suitable leads for connection of power and pushbutton.
Plug and connector for power lead.
Plug and connector for pushbutton lead (different type from above plug, to avoid misconnections!)
A plastic box to for the switches and capacitor, approx. 25 x 50 x 100 mm.
A piece of brass sheet, 75 x 105 mm , approx. 1 mm thick.
A 25 to 35 mm long piece of 12 mm diameter, round brass rod.
A short piece of 6 mm (outer diameter) brass (or copper) tube.
Three M 3.5 x 10mm machine screws, plus miscellaneous screws, nuts & bolts.
NOTE: The M 3.5 size may be hard to get in the US & UK
and other areas where nuts & bolts are (still) measured in inches.
However, since the Bolex has ready-made mounting holes
in the M 3.5 size, these 3 screws are really a necessity. |
Tools, such as electric drill with bits & drill stand, soldering iron, metal file, metal saw, a butane pencil torch, etc.
Some dexterity and familiarity with the tools above. I assume no responsibility for any accidents or mishaps (or whatever!) that happen when you, or your helpful friend, follow these instructions... So be careful, and don't let your dog chew on the electric drill's power cord... ;-)
Now, when you have everything at hand, let's move to the actual construction, on the NEXT page
 This motor is easily attached to the side of a Bolex H16 Reflex camera. It requires no modification to the camera, and is attached with only 3 screws, in existing threaded holes in the camera body.
 First you must check the Bolex model you have. If the camera's side looks like in this picture,then it lacks the "1:1" axle, and you cannot use this motor. Sorry about that...
 But, if your camera looks like this, you're in luck: It has the required "1:1" axle, which rotates one turn per frame. (See arrow!)